
Best AMD Monitor Under R2000 in SA 2026
Top AMD Monitor Under R2000 picks evaluated on performance, value & SA availability with current Rand pricing from Evetech.
Read moreTempered glass PC cable management made simple: learn neat routing, sleeving, tie-downs and hidden power runs to keep your showcase build spotless and photogenic. 🛠️✨

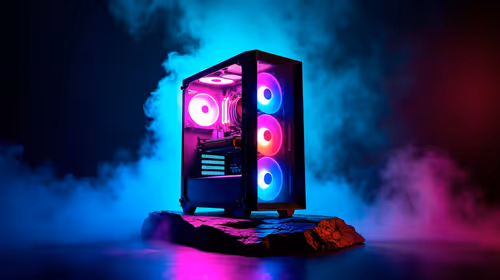
That beautiful tempered glass PC case looks stunning… until you switch it on and see a chaotic nest of cables staring back. Sound familiar? For South African builders, a glass panel is a window into your rig's soul, not a showcase for spaghetti. Nailing your tempered glass PC cable management is the final boss of any clean build. Let's conquer it together and turn that mess into a masterpiece. ✨
Sure, a clean build is amazing to look at, but proper cable management in a tempered glass case offers practical benefits too. The most important one? Airflow. Bundled, messy cables can obstruct fans and create hot spots, potentially throttling your performance when you're deep in a game of Warzone or rendering a complex project.
Good tempered glass PC cable management ensures air moves freely from your intake fans, over your critical components like the CPU and GPU, and out the exhaust. It’s a simple step that helps your hardware run cooler, quieter, and last longer.
Before a single component goes in, the secret to flawless cable management begins. Take a moment to familiarise yourself with your chassis. Where are the cutouts and rubber grommets? Does it have a power supply shroud (basement) to hide the bulky cables? Which path will your 24-pin motherboard power, 8-pin CPU power, and GPU power cables take?
Thinking this through first saves you a massive headache later. Most modern computer cases are designed with routing channels and tie-down points on the back of the motherboard tray. Use them! This is the single most effective technique for a clean visible build.
Always route the 8-pin CPU power cable before you screw down your motherboard. This cable usually goes to the top-left corner of the board, a spot that becomes almost impossible to reach once the motherboard and cooler are installed. Feed it through the appropriate cutout first to save yourself a world of frustration.
You don't need a massive workshop, but a few key items make the job infinitely easier.
With these simple tools, you have everything you need to start organising those cables and improving your PC's internal layout.
Modern PC cases are your best ally in the fight for clean cabling. Even affordable cases are now packed with features that were once considered premium. Many stylish Gamdias gaming cases, for example, offer PSU shrouds and generous space behind the motherboard.
Look for these key features when managing your cables:
This is your secret weapon. A power supply shroud hides the PSU itself and provides a perfect compartment to stuff all the excess cable lengths from your modular or non-modular power supply. Out of sight, out of mind!
These are the indented channels and small loops on the back of the motherboard tray. Route your main cables through these channels and use zip ties or Velcro straps on the tie-down points to secure them. This keeps the back panel just as tidy as the front. You can find excellent options under R1500 that include these helpful features.
Patience is key. Working cable by cable and planning your routes will transform your PC's interior from chaotic to clinical. Your reward is a stunning, cool-running machine you'll be proud to show off. 🚀
Ready to Showcase Your Build? A clean build starts with a great chassis. If your current case is making cable management a nightmare, it might be time for an upgrade. Explore our massive range of computer cases and find the perfect canvas for your next masterpiece.
Begin with a clean layout: install core components, route PSU cables behind the tray, and use Velcro ties and channels to create tidy visible runs.
Use cable combs, angled cutters, zip ties, Velcro straps, and adhesive cable channels to control visible PC cable routing and maintain a polished look.
Yes. Cable sleeving improves aesthetics and helps keep visible cables organized, especially for RGB and custom-length power runs.
Use a modular PSU, shorten runs, route cables behind the motherboard tray, and use the PSU shroud to conceal excess cable length.
Cable combs are optional but effective: they keep individually sleeved cables aligned for a clean, professional visible cable layout.
Common errors include excess cable length, inconsistent sleeving, and skipping anchor points; these create clutter behind the glass.
Plan RGB cable paths early, use short extensions, bundle with Velcro, and run them along case edges to keep the front panel clear.
Top AMD Monitor Under R2000 picks evaluated on performance, value & SA availability with current Rand pricing from Evetech.
Read more
UJ Eng: Monitor Setup Under R15000. Clear setup instructions with SA-specific considerations, troubleshooting tips & recommended components.
Read more
Top NZXT Monitor Under R15000 picks evaluated on performance, value & SA availability with current Rand pricing from Evetech.
Read more
Top 240Hz Monitor Under R20000 picks evaluated on performance, value & SA availability with current Rand pricing from Evetech.
Read more
Top Budget 4K monitor Under R5000 Gamers picks evaluated on performance, value & SA availability with current Rand pricing from Evetech.
Read more
Stellenbosch Arch: Monitor Setup Under R15000. Clear setup instructions with SA-specific considerations, troubleshooting tips & recommended components.
Read more
When Will the RTX 6090 Launch in South Africa Detailed answer with SA data, expert analysis & practical recommendations for local buyers.
Top Valorant Settings for RTX 5070: FPS Optimisation picks evaluated on performance, value & SA availability with current Rand pricing from Evetech.
RDNA 3.5 Graphics in Ryzen AI 400? Can You Game. Plain-English explanation of what it means, why it matters & how it affects your buying decisions in SA.
GPU Price Index : December Report. Current stock data & price tracking for SA buyers. See what is available and where prices are heading.
Can the RX 7700 XT Handle 1440p 144Hz Gaming. Performance testing verdict with real data & practical recommendations for SA buyers.
Top Laptop with Core i7 + RX 7700S: Picks picks evaluated on performance, value & SA availability with current Rand pricing from Evetech.
RX 7700 XT Black Myth Wukong 2 FPS: Performance. Real-world benchmark data, FPS numbers & performance analysis. What SA gamers can actually expect.

RTX 6080 Gran Turismo 7 PC Performance: FPS Test. Real-world benchmark data, FPS numbers & performance analysis. What SA gamers can actually expect.

Setting Up Monitor Light. Tested & verified settings for best FPS and visual quality on SA hardware budgets.
Assassins Creed Shadows Ultrawide Support: 21:9. Clear setup instructions with SA-specific considerations, troubleshooting tips & recommended components.
Complete Gaming Setup Guide for the Collector. Clear setup instructions with SA-specific considerations, troubleshooting tips & recommended components.
Will the Steam Deck 2 Have an OLED Screen? Leaked. Plain-English explanation of what it means, why it matters & how it affects your buying decisions in SA.