Is your PC getting a bit hot under the collar during those intense gaming sessions? You're not alone. A hot PC means throttled performance, and nobody wants that. The DeepCool CH510 is a popular case, but a common question we get is about its pre-installed fans. Are they enough to keep your rig frosty, or are they just a starting point? ❄️
Let's dive in and show you how to maximise the cooling efficiency of your CH510 pre-installed fans.
Understanding the Stock Airflow
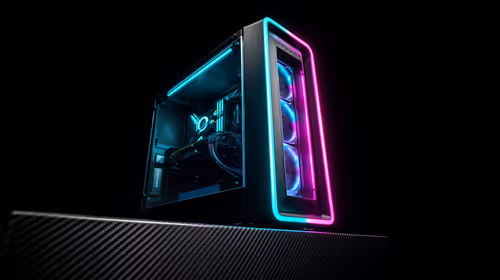
The DeepCool CH510 typically ships with a high-quality, performance-tuned fan installed at the rear for exhaust. This is a smart design choice. It immediately creates negative pressure, pulling hot air generated by your CPU and GPU out of the case.
For many mid-range builds, this single fan is surprisingly effective. It ensures that the most critical heat source—the CPU area—has a direct path for hot air to escape. But can you do better without spending an extra rand? Absolutely. The key to optimising the CH510 pre-installed fans lies in managing the entire airflow system.
How to Maximise Cooling Efficiency
Before you rush out to buy a three-pack of RGB fans, try these free optimisations. You can often achieve significant temperature drops by simply fine-tuning what you already have.
Fine-Tune Your Fan Curves
Your motherboard's BIOS is your best friend here. Most manufacturers set their default fan curves to be quiet rather than powerful. By setting a custom curve, you can tell the CH510's pre-installed fan to ramp up more aggressively as your CPU temperature rises, providing more cooling when it actually matters.
BIOS Pro Tip 🔧
Reboot your PC and enter the BIOS (usually by pressing DEL or F2). Look for a 'Hardware Monitor' or 'Fan Control' section. Instead of 'Silent' or 'Standard' mode, select 'Custom'. Set the fan to run at low speed (e.g., 30%) until the CPU hits 50°C, then create a gentle curve up to 80-100% speed as it approaches 75°C. This keeps your PC quiet during light tasks and cool while gaming.
Check Your Component Placement
The effectiveness of your CH510's cooling also depends on what's inside. Ensure that cables are neatly managed and tucked away, not obstructing the path from the front intake to the rear exhaust. A messy build traps pockets of hot air, making your fans work harder for worse results. A few cable ties can make a world of difference.
When to Consider an Upgrade
While the stock setup is decent, there's a point where a single exhaust fan isn't enough. If you're running a high-end graphics card like an RTX 4070 or a beefy CPU, you'll need to add more fans.
Adding two 120mm or 140mm fans to the front of the CH510 as intakes will dramatically improve cooling performance. This creates a balanced airflow path, feeding cool air directly to your components. Sometimes, though, your needs might change entirely. If you're chasing a specific aesthetic with more lighting, a feature-packed ARGB case like the Cooler Master E301 might be a better fit from the start.
For those loyal to a particular brand's ecosystem, you can explore the full Cooler Master case lineup to find matching components. And if budget is your main concern, there are always great value options from GameMax that deliver excellent airflow without breaking the bank. ✨
Ultimately, the CH510 pre-installed fans provide a fantastic foundation, but the real magic happens when you tailor your cooling to your specific hardware.
Ready for the Ultimate Chill? Whether you're optimising your current case or planning a brand-new build, the right chassis is crucial. A cooler PC is a faster PC. Browse our huge range of computer cases and find the perfect foundation for your rig today.