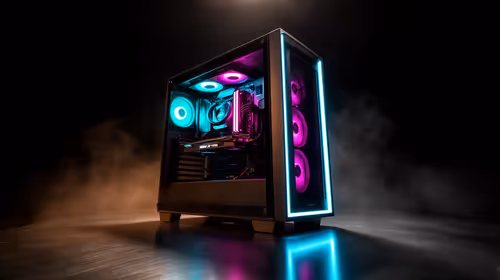
So, you’ve just assembled your beast of a gaming rig. The RGB is glowing, the cables are managed... but your CPU temperatures are soaring higher than the national debt. What gives? For many South African builders, the dream of a silent, ice-cold PC can quickly turn into a nightmare. Often, the culprit is one of several common but easily avoidable liquid cooling mistakes. Let’s dive in and make sure your high-performance PC runs cool and quiet. 🔧
Key Liquid Cooling Mistakes and How to Fix Them
Building a PC is a journey, and even seasoned pros can slip up. When it comes to AIO (All-In-One) or custom loop cooling, a small error can lead to big thermal problems. Here are the most frequent liquid cooling mistakes to avoid to ensure you get the performance you paid for.
1. Choosing the Wrong Radiator Size
It’s tempting to grab the first AIO cooler that fits your budget, but size truly matters. A small 120mm radiator might be fine for a mid-range CPU, but it will struggle to dissipate the heat from a power-hungry Intel Core i9 or AMD Ryzen 9, especially when overclocked.
The Fix: Check your case specifications first! See what the maximum radiator size it supports is (e.g., 240mm, 280mm, or 360mm). As a rule of thumb, a 240mm AIO is a great starting point for most modern gaming CPUs. For high-end processors or serious overclocking, a 360mm radiator is your best bet for keeping those temps in check.
2. Incorrect Fan and Pump Placement
This is perhaps the most common liquid cooling blunder. An AIO cooler is a closed loop, and air bubbles are its enemy. If the pump is the highest point in the loop, air will naturally collect there, causing noise, reducing efficiency, and shortening the pump's lifespan.
The Fix: Whenever possible, mount your radiator at the top of your case with the tubes running downwards to the CPU block. If you must front-mount it, ensure the tubes are at the bottom of the radiator. This simple orientation trick keeps any air trapped at the top of the radiator, far away from the pump. ✨
Pro Tip: The First Boot ⚡
On the very first boot after installing your AIO, gently tilt your PC case from side to side. This helps dislodge any stubborn air bubbles that might be trapped in the pump or block and encourages them to move to the highest point in the radiator, ensuring a quieter and more efficient operation from the get-go.
3. Mismanaging Fan Direction
Your radiator fans need to work together, not fight each other. Setting them up as intake (pulling cool air from outside through the radiator) or exhaust (pushing hot air from inside the case through the radiator) depends on your overall airflow strategy. The mistake is having them pointing in random directions.
The Fix: Decide on your airflow path. For a front-mounted radiator, using the fans as intake is usually best, feeding your GPU with cool air. For a top-mounted radiator, setting the fans as exhaust helps to expel rising hot air from the case. Consistency is key for optimal performance.
4. Perfecting the Peripherals
Once your PC’s core components are running cool and stable, it’s easy to overlook the parts you interact with directly. A high-performance machine deserves high-performance peripherals. Don't let a mushy, unresponsive keyboard be the bottleneck for your gaming skill. After all, what’s the point of 200 FPS if your gear can’t keep up?
Investing in a responsive gaming keyboard can make a world of difference in competitive titles. For those who demand the best tactile feel and customisation, exploring premium options like Glorious Gaming keyboards is a fantastic next step. Brands like Razer have built their reputation on performance, and grabbing a top-tier Razer gaming keyboard is a surefire way to elevate your setup. Plus, nothing completes the look of a custom build like the synchronised glow from a full RGB Razer keyboard. 🚀
Final Check: Avoiding Cooling Catastrophe
By sidestepping these common liquid cooling mistakes, you're not just building a PC; you're crafting a reliable, high-performance machine. Double-check your radiator placement, fan orientation, and thermal paste application. A few extra minutes of care during the build process will save you hours of troubleshooting and ensure your components last for years to come.
Ready to Build Your Ultimate Cooled PC? Getting your cooling right is the foundation of a powerful and stable rig. From AIO coolers to the perfect case, we've got what you need. Explore our massive range of PC components and start building the cool, quiet machine you've always wanted.