
Clean Gaming Keyboard: Guide for Dusty & Humid Conditions
Clean gaming keyboard quickly and safely in dusty or humid conditions with step-by-step tips, tool checklist, and maintenance routines to prevent corrosion and switch failure. 🧼💨
Read moreMSI X870E Tomahawk MAX setup made simple — step-by-step unboxing, safe component installation, and BIOS configuration to optimize stability and performance for builders. ⚙️📘

So, you’ve got your hands on the new MSI X870E Tomahawk MAX. Awesome choice! This motherboard is the perfect foundation for a beastly next-gen AMD rig, but a powerful board needs a proper setup. Don’t worry, we’ve got your back. This guide will walk you through everything from unboxing your new pride and joy to the essential first steps in the BIOS configuration, ensuring you get maximum performance from day one. 🚀
That new component smell... there's nothing quite like it. Sliding the MSI MAG X870E TOMAHAWK MAX WIFI PZ out of its anti-static bag, the first thing you'll notice is the weight. This isn't some flimsy piece of kit; the extended heatsinks covering the VRMs and the M.2 slots feel substantial and ready for serious work.
Inside the box, MSI includes the essentials:
The all-black aesthetic with minimal branding looks clean and professional, ready to be the stealthy heart of your build.
Getting your motherboard into the case is the most crucial part of any build. This is where the complete MSI X870E Tomahawk MAX setup process truly begins.
First, ensure your case standoffs are correctly positioned for an ATX board. Misplacing one can lead to a short circuit, and nobody wants that headache. The Tomahawk MAX features a pre-installed I/O shield, which makes slotting it into the case a breeze.
Next, install your CPU and RAM. The AM5 socket has a satisfyingly firm locking mechanism. When installing your DDR5 memory, remember to use the A2 and B2 slots first (the second and fourth slots from the CPU) to enable dual-channel mode for optimal performance. This is a common mistake that can seriously hamper your speed, but it's a standard practice across most modern AMD motherboards.
It's easy to get excited and forget the basics. The X870E Tomahawk MAX has two 8-pin CPU power connectors near the top of the board. For most Ryzen 7 and Ryzen 9 CPUs, you'll want to plug in both to ensure stable power delivery, especially if you plan on overclocking. Check your power supply to make sure you have the required cables.
Finally, install your M.2 SSDs using the tool-free clips and connect your front panel I/O. The clearly labelled headers make this part of the installation process much less intimidating than it used to be.
With everything connected, it's time for the moment of truth. Power on your system and repeatedly press the 'Delete' key to enter the BIOS. Welcome to MSI's Click BIOS 5.
The BIOS will likely open in EZ Mode, which gives you a simple dashboard view of your system's vitals. It’s great for a quick check, but the real magic happens in Advanced Mode (press F7). This is where your MSI X870E Tomahawk MAX BIOS configuration takes shape.
Completing this initial setup ensures your powerful new hardware runs as intended. It's a small time investment that pays off massively in performance and stability, proving you don't need to spend a fortune to get a premium experience when you find the right motherboard for your budget. ✨
Ready to Build Your Next-Gen Rig? The MSI X870E Tomahawk MAX is a powerful foundation for any high-end build. Whether you're upgrading or starting fresh, getting the right motherboard is key. Explore our full range of PC components and build the machine you've always dreamed of.
Confirm all accessories, inspect the board for damage, update the CPU socket cover instructions, and read the quick start for standoff placement.
Download the latest BIOS from MSI, copy to a FAT32 USB, use M-Flash in BIOS, and follow on-screen prompts to flash safely.
Enable XMP/DOCP for memory, set SATA/NVMe priorities, configure boot order, and update power or fan profiles for stability.
Install matched DIMMs in the recommended slots (refer to manual), seat until clips click, then enable XMP/DOCP in BIOS for rated speeds.
The board supports compatible AM5 CPUs; check MSI compatibility and update BIOS if your CPU requires a newer microcode.
Reseat CPU/RAM, clear CMOS, check power connectors, test one RAM stick, and verify PSU cables and front-panel wiring.
Enable XMP/DOCP, update chipset drivers, tune fan curves, and apply firmware updates for stable gaming and productivity.
Clean gaming keyboard quickly and safely in dusty or humid conditions with step-by-step tips, tool checklist, and maintenance routines to prevent corrosion and switch failure. 🧼💨
Read more
Best gaming keyboard features to prioritize when building a high-end setup: mechanical switches, low latency, hot-swap, RGB, macros, durability and ergonomics 🎮⌨️
Read more
Custom actuation point keyboard setup guide: learn to set per-key actuation on your analog gaming keyboard for faster, precise inputs and better control 🎮⚙️
Read more
Cable management for home entertainment helps you eliminate cable clutter quickly and safely. Learn routing, concealment, and product picks to tidy your setup fast 📺🔌
Read more
conference room setup Microsoft Teams Zoom: Upgrade AV, camera, mic, and network to ensure seamless meetings, clear audio, and crisp video 🎯🔧
Read more
• Audit setup • Link accounts • Configure ViewBoard • Test workflows Integrate Google Workspace with ViewSonic ViewBoard to enable secure SSO, calendar and Drive sync, and smooth collaborative whiteboarding 🔗📋
Read more
Discover webcams that automatically adjust light and color for crystal-clear video calls 🎥✨. Boost your streaming quality today!
Read more
Discover webcams that blend into your workflow 🎯 Capture moments while you work, stream, or create. Upgrade your setup with smart, multitasking tech!
Read more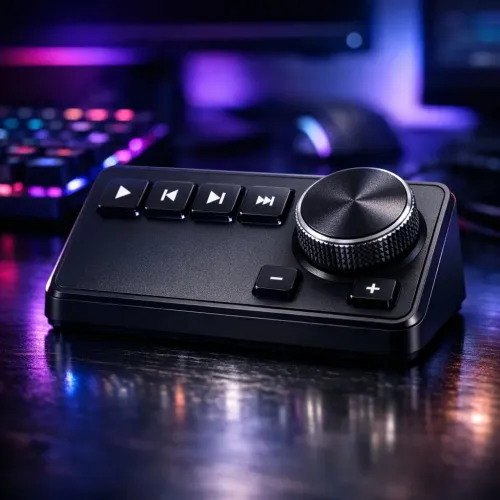
Dedicated media keys give streamers one-touch control to mute, switch scenes, clip highlights, and adjust audio — cutting task time and boosting consistency 🎛️⚡
Read more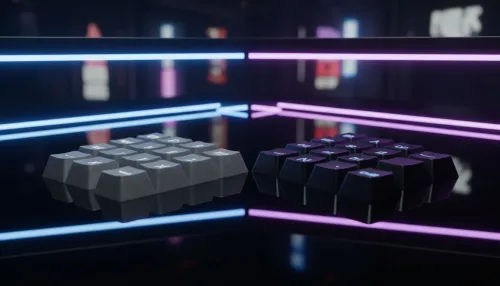
PBT vs ABS keycaps: Clear, local guide for South African gamers—compare feel, sound, durability and where to buy. Find the best material for your budget and playstyle 🎮🇿🇦
Read more
- Multi-Function Digital Dial: define benefits - Show gamer setups and macros - Offer buying and setup tips Multi-Function Digital Dial puts programmable control at your fingertips for faster actions and smoother streaming. 🎮⚙️
Read more
- Explain benefits; - Show the science; - Compare options; - Recommend picks. Magnetic wrist rest for gaming cuts wrist strain and boosts comfort during long sessions 🕹️✨
Read more